Using LexiPanel v1.01 |
Scroll down and read or click a link to jump to a particular section.
The very first time you run LexiPanel you will be presented with this dialog box:
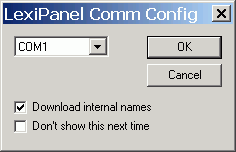
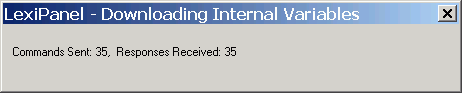
If you click the "Don't show this next time" box then you will not see this dialog the next time you start LexiPanel.. While LexiPanel is downloading internal variables you will see this dialog (but the numbers for commands sent and responses received should be changing).
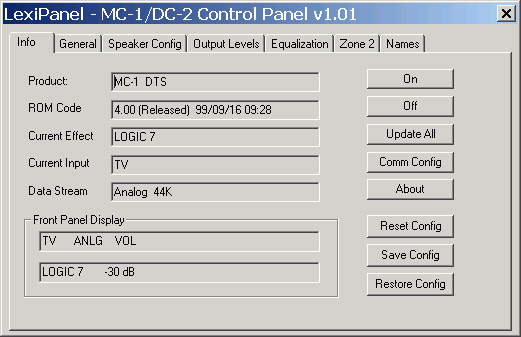
Once the internal variables are downloaded you will see LexiiPanel's main tabbed dialog:. Most of the fields are pretty obvious. The Front Panel Display shows what is currently on the display panel. Here is the description of each button:
Button functions:
ON - Turns the unit on if it isn't already on.
OFF - Turns the unit off if it isn't already off
Update ALL - will read all of the parameters again from the unit and update all controls in all tabs in the program.
Comm Config - Opens the dialog to allow you to change serial port. You can also elect to force the download of internal names the next time the program is started.
About - brings up a dialog showing program information
Reset Config - reset the unit back to factory defaults.
Save Config - will query the unit and save all parameters into a file that you select. You can browse to a directory and changed the save filename. The save directory is saved between making it convenient to come back to the directory even between invocations of the program. The settings can then later be restored with the Restore Config button.
Restore Config - restores the configuration from a previously saved configuration (see Save Config above).
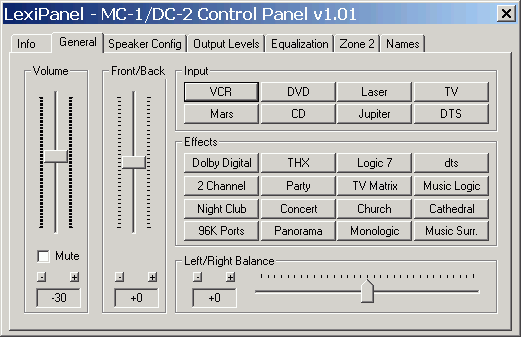
Clicking the General Tab brings up the master volume, balance controls and Input and Effect selections. You can select and drag the handle on the volume and balance slider controls or click the tiny
buttons with the "+" or "-" to incrementally increase or decrease the control. Clicking the Mute checkbox will immediately mute the unit.
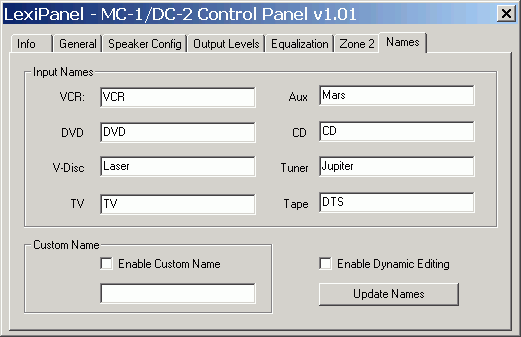
To change the input you can click one of the eight buttons. As you may notice some of the buttons below have strange names like "MARS" and "JUPITER". That's because I renamed them to those names in the
Names tab! Lastly you can change the effect by pressing the appropriate button in the Effects section.
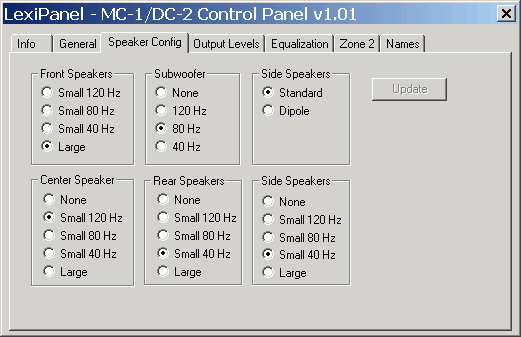
Clicking the Speaker Config Tab shows the current speaker configuration. Unlike the other controls up to this point changing the speaker type does not immediately take effect. This is so because executing the command causes a brief lapse in sound output so I decided to allow the user to make all the changes then press the UPDATE button.
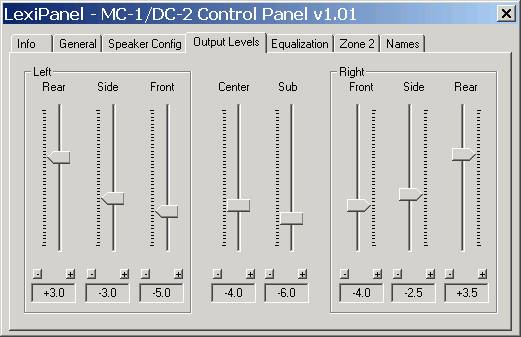
Clicking the Output Levels tab will bring up the configuration of the unit's output levels. Changes can be made easily from this window by clicking and dragging the sliders or incrementally by clicking the small buttons with "+" and "-". Changes take effect immediately.
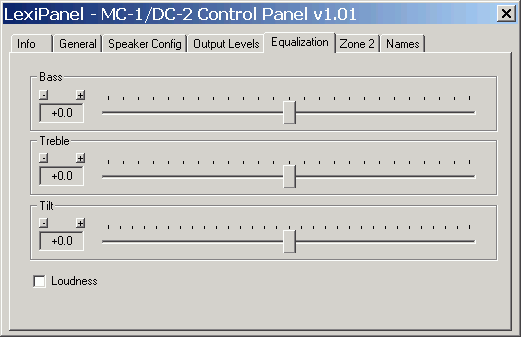
Clicking the Equalization tab shows sliders for Bass, Treble, and Tilt. You can drag the slider or click on the buttons to change the levels of equalization. Checking the Loudness box will turn on loudness for the unit.
Clicking the Zone 2 tab shows the controls for Zone 2. To Enable it then press the appropriate zone-2 input button. To disable Zone-2 press the Clear Input button. Volume and Balance can be controlled with the appropriate slider or with the small "+" and "-" buttons. Turn Zone-2/record on by clicking the checkbox with that name.

Lastly, clicking the Names tab shows the controls to rename the input channels. Check the Enable Dynamic Editing option to see the name change as you type it if that input is selected. The name changes here are represented on the input buttons on the General tab. Enabling snd setting the Custom name will cause the name/message to scroll across the unit's front panel when it is powered on.